Booking Flights with the Mobile App
To book a flight, follow these steps:
- Tap the Flight choice on the Home screen. The Flight Search screen appears:
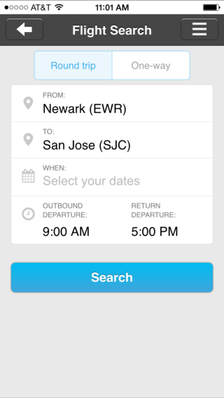
- Tap the Round trip tab for a round trip, or the One-way tab for a one-way trip.
- The From field may already contain the home airport from your profile, or the airport closest to your location. To change it, or to enter a new airport location, tap From. The Enter location screen appears.
- Tap Enter location to enter a location, or tap Use current location. If you are entering a location, the keyboard appears. As you enter characters (such as a city name or airport acronym), suggestions appear, and you can tap a selection to choose it, or enter the full name and tap Done.
- Tap the To field to enter the destination. Tap Use current location, or enter a location as described in the previous step.
- Tap the When field to select the date for a one-way trip, or two dates for a round trip. A scrollable calendar appears. Tap a departure date on the calendar. If you are booking a round trip, tap both the departure date of the first leg, and then tap the departure date of the return leg, and a range of dates are automatically selected. If your round trip occurs in a single day, tap the same date twice. Tap Done to finish.
- To specify the departure time for a one-way flight, tap the Outbound Departure field, and choose the time from the menu. To specify the departure times for both flights in a round-trip booking, tap the Outbound Departure field and choose the time from the menu for the first flight, and tap the Return Departure field and choose the time from the menu for the return flight. The system uses these preferred times to narrow the flight search to those flights that come closest to matching these departure preferred times.
Tap Search. The flight selections appear:
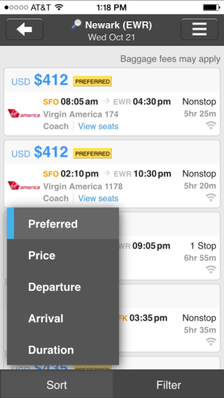
Note: Flight selections may be marked (such as "Preferred") to match corporate policies for preferred airlines, fares, and unused tickets. Also, if unused tickets are configured and available for a flight solution, the unused tickets are highlighted in the flight search results.- (Optional) Tap Sort to sort flight results by tapping Preferred, Price, Departure, Arrival, or Duration.
- (Optional) Tap Filter to filter flight results, and then tap Done to finish. You can filter the results by selecting:
- Number of stops
- Company policy: Any flight, or In policy only
- Airlines
- Departure time
- Arrival time
- (Optional) Choose a seat for the departure flight or connecting flights. Follow these steps:
- Tap the View seats link within a flight choice to see and pick an available seat.
- Tap a blue square for an available seat. If you choose an exit row seat, a dialog appears to confirm your ability to sit in an exit row.
- Tap Next to view seats for a connecting flight if you have a connecting flight. When finished, tap Done. The flight results appear again, with seat assignments for the flight choice.
- Tip: You can "pin" seats for several flight choices at once, so that you don't lose the seats while choosing a flight. Follow these steps:
- Tap View seats for a flight choice, and pick a seat (and another for a connecting flight).
- When you return to the flight results, tap View seats for another flight choice and pick a seat (and another for a connecting flight).
- Repeat these steps for as many flights as you want. Each flight choice will now include seat assignments.
- Select a flight choice to show its details, and then tap the Select button.
- For a round trip, repeat Steps 9-12 to select the flight.
- The Review Itinerary appears. Do one of the following:
- To purchase the flight, scroll to the bottom of the screen and tap Checkout.
- To change the flight, tap the Change Flight link.
- To add a hotel or car rental, tap the Add Hotel or Add Car Rental link. The hotel or car rental results are based on the flight destination. See Booking Hotels with the Mobile App or Booking Car Rentals with the Mobile App for further instructions. After selecting a hotel, or a hotel and a car rental, tap Checkout.
- To return to the Home screen without purchasing, tap the options button in the top right corner and tap Home. You can also tap the back button in the upper left corner to go backward, screen by screen, and change your choices.
Tip: You can tap the Baggage Fees and Fare Rules links in the Review Itinerary screen to see details about fees and rules.
Your travel preferences, such as airline mileage plan and meal preferences, as well as your payment card information, are drawn from your profile to complete the transaction. See Your Profile for details.
Note:
- You can't add a hotel or car rental to a multi-city flight itinerary.
- You can't add a train segment to a flight, hotel, or car rental trip.