Setting Up Cost Allocation
Overview of Cost Allocation
Cost allocation attributes expenses to particular cost segments such as “projects” or “store locations” that contain specific cost allocation codes (such as “1001 Project ABC” or “101 San Francisco Store”). Employees can enter cost allocations when adding or editing expense report line items (see Allocating Cost for an Expense Report Line Item for details).
Cost allocation provides the following for administrators:
Cost allocation codes: Many businesses already use cost allocation codes (such as “1001”) representing specific cost centers in the organization. As an administrator, you can enter these codes into a cost segment along with text labels that identify them (for example, “1001 Project ABCD”) so that employees can assign them to line items of an expense report. The administrator must include a label so that employees can recognize the code and select it from the list.
Active cost segments: As an administrator, you can set up any number of cost segments. You can also designate cost segments as active (in use) or inactive (not in use).
Validated list of cost allocation codes: For each cost segment, as an administrator you can set up a validated list of cost allocation codes, so that the employee can select from a list of valid values. For example, if a business allocates costs based on store locations, you can add each store location name and code, and the employees can select different store locations to allocate expenses by store.
Dynamic list of cost allocation codes: As an administrator, you can set up a dynamic list of cost allocation codes for the cost segment so that employees can either select from a list of values or add a new value. For example, a business that allocates costs based on the project can set up a dynamic list of projects, and employees can add new projects as needed. If the employee enters a new value (such as a new project), this value becomes active so that other users can also select it.
Cost allocation approvers: Companies can control spending by project or other specific cost allocation by assigning approvers who must approve expense reports that reference the project or other specific cost allocation.
Setting Up Cost Segments
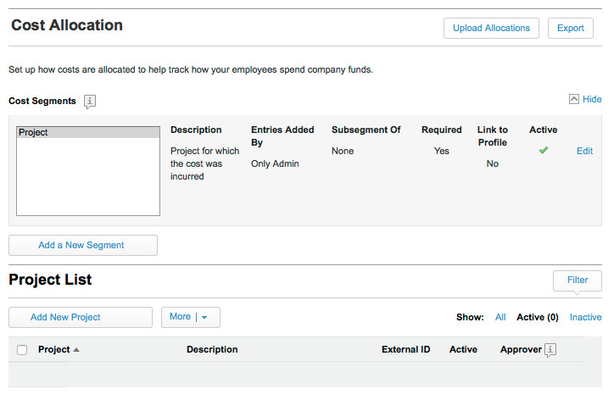
To set up cost allocation, click the Cost Allocation link in the left column of the Services | Expense page. The Cost Allocation section of the page shows a single inactive cost segment called Project. Below the cost segment is an empty list of cost allocation codes (projects) for the Project cost segment:
Adding or Editing a Cost Segment
You can use the Project cost segment for cost allocation codes by editing it, or you can add a new cost segment:
- To edit the Project cost segment, click the cost segment name (Project), and then click the Edit link on the right side of the page for the Project cost segment. The Edit Cost Segment dialog appears, and you can change the options below.
- To add a new cost segment, click the Add a New Segment button under the selection box in the Cost Segments section of the page. The New Cost Segment dialog appears, and you can set the options below.
Defining the Cost Segment
In the Edit Cost Segment or New Cost Segment dialog, follow these steps:
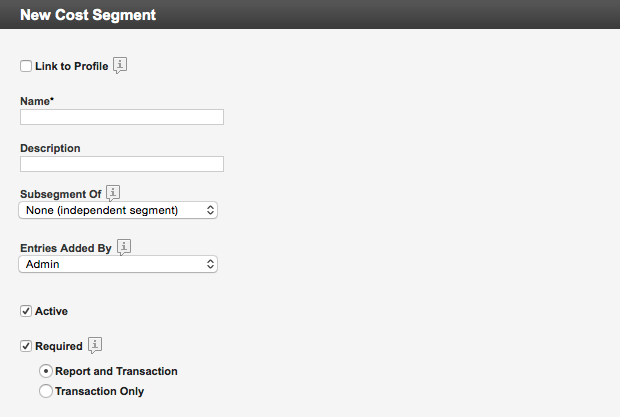
- Link to Profile and Name: Click the Link to Profile checkbox to link the cost segment to a profile field. You can then choose the profile field, such as Department or Cost Center, from the Name dropdown menu. If you don't click this checkbox, you can enter a name for the cost segment in the Name field.
- Description: Enter a description for this cost segment.
- Subsegment Of (optional): Choose a parent cost segment for this cost segment from the dropdown menu (you must have already created the parent segment; see "Setting Up a Parent Segment and Child Subsegment" in this topic).
- Entries Added By: This option defines whether entries can be added to the cost segment by employees or not. If you’re defining a subsegment, this option matches the setting for the parent segment and is grayed out. For a parent cost segment, choose one of the following:
- Admin: Set up a validated list of entries (cost allocation codes) for this segment that only you (an administrator) can change.
- Admin and Employees: Set up a dynamic list that shows entries but also allows employees to add more entries.
- Required: Click the checkbox for this option to require users to specify a cost allocation code for this cost segment for every expense they enter.
- If Required is checked, the cost segment is mandatory, and the employee must choose a cost allocation code in this cost segment for each line item. If Required is checked, you can also choose:
- Report and Transaction: Click this radio button to require the cost segment at both the report level and the transaction level. At the report level, the selected cost allocation applies to all line items in the report.
- Transaction Only: Click this radio button to require the cost segment at the transaction level only. The submitter can choose different cost allocations for these cost segments for each line item of the expense report.
- If Required is not checked, the cost segment is optional rather than mandatory and may be blank for expense report line items when the report is submitted.
Note: If you’re defining a subsegment, this option matches the setting for the parent segment and is grayed out.
Tip: If an expense report line item is a non-business expense, the employee does not need to allocate the cost whether this option is checked or not. The cost allocation section does not appear for line items that are non-business expenses.
- If Required is checked, the cost segment is mandatory, and the employee must choose a cost allocation code in this cost segment for each line item. If Required is checked, you can also choose:
Defining the Expense Types that Show a Cost Segment
You can associate expense types with this cost segment by clicking the Expense Types subheading to show the expense types:

By default, all expense types are selected, which means that this cost segment would appear for expense report line items that use any of the expense types. You can limit the number of expense types that would show this cost segment by clicking the "Select all" checkbox to remove all checks, and then click the checkbox for each expense type that should show this cost segment.
Note: You can also define the cost segments to appear with an expense type. See Setting Up Expense Types for instructions.
Activating and Saving the Cost Segment
Follow these steps to activate and save the cost segment:
- Active: Click the checkbox for this option to make the segment active; otherwise the segment is inactive. Uncheck this option to deactivate the segment. If a segment is inactive, employees can’t use it for cost allocation. If a parent cost segment is set to be inactive, any child subsegments of the parent are also set to be inactive.
- Click the Save button to save the changes to the cost segment.
Setting Up a Parent Segment and Child Subsegment
You can also create a cost segment with subsegments. For example, you can create a cost segment called “Client” for clients that has a subsegment called “Project” for projects. Add the parent cost segment (Client) first, and then add the Project segment and choose the parent segment from the Subsegment Of drop-down menu in the Add Cost Segment dialog or Edit Cost Segment dialog.
Adding Cost Allocation Codes to Each Segment
To add cost allocation codes to a cost segment — such as projects for the Project cost segment, or store locations for a Store Location cost segment — follow these steps:
- Select the cost segment in the Cost Segment box (or dropdown menu, if the cost segment section is hidden).
- Click the Add New button (Add New Project in the figure below) in the List section. A new area appears in the List section for adding new entries to the segment:
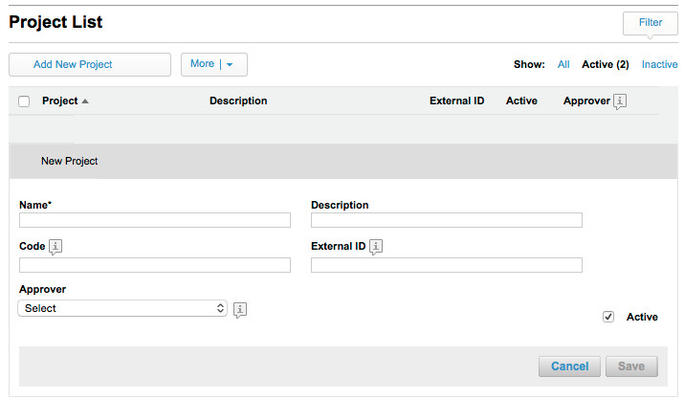
- Enter the name in the Name field, and the description in the Description field.
- Enter a code used for accounting purposes in the Code field, and any other ID you need (such as a payroll system ID) in the External ID field.
- Choose the approver for this cost allocation code from the Approver dropdown menu. This assignment establishes the cost allocation approver. See "Assigning Approvers for Cost Allocations" in this topic for details about cost allocation approvers.
- Click the Active checkbox to make the cost allocation code active.
- Click Save to save your changes.
To edit a cost allocation code (such as a project in the Projects cost segment), click the Edit button that appears in the right column of the cost allocation code list. The fields appear as shown above for a new cost allocation code. If the Active check box is unchecked, the entry is inactive and does not appear in the cost allocation code list.
Note: If an unsubmitted or denied expense report transaction was assigned to a code that has been deactivated, the transaction reverts back to unallocated, and the employee can reallocate the transaction to an active code. If the cost segment is mandatory, the employee must select a different cost allocation code prior to submitting the expense report. Transactions in expense reports that have already been submitted are not affected if a cost segment or a cost allocation code is deactivated. The assigned allocation still appears in all views of the expense report and in exports.
If you are adding cost allocation codes such as projects to a subsegment such as Project (whose parent is Client), you must specify with each project the client that must be assigned to it. If you assign the parent segment to the subsegment’s cost allocation codes, employees allocating an expense must first select the parent segment (the client), and then select the subsegment (the project).
Assigning Approvers for Cost Allocations
If you choose an approver for a cost allocation code from the Approver dropdown menu as described in the previous section (Step 5), each submitted expense report that references the cost allocation must then be approved by the cost allocation approver as well as by the submitter's approver. When a submitter assigns the cost allocation code for an expense report line item and then submits the expense report, a notification is sent to the cost allocation approver, who must approve the expense report line item before the expense report can be routed to the submitter's approver.
If, in an expense report, the submitter selects more than one cost allocation that has an approver, the expense report is routed in parallel to the approvers for those cost allocations. The expense report must be approved by all approvers in order to be paid.
The cost allocation approver can only approve or deny the report and can't make adjustments. Denying the report triggers a review by all approvers upon resubmission.
Note: If the cost allocation approver is the same as the user's approver, the approver needs only to approve or deny once, and two records are added to history: one for the submitter's approver and one for the cost allocation approver.
Uploading Cost Allocation Codes for Each Segment
To upload the cost segment codes for a defined cost segment (such as “Project Jupiter” or “Project Mars” for “Project”), follow these steps:
- Select the cost segment (such as Project).
- Download or export the upload template:
- If you have no other cost allocation codes assigned, start by downloading the cost_allocation_upload_template.csv template.
- If you already have cost allocations assigned, you can click the Export button in the top right corner to export your existing cost allocation values as a spreadsheet, and then use the exported spreadsheet as a template.
- Save a new version of the exported spreadsheet, and edit the new spreadsheet using software such as Microsoft Excel. Do not change the header names (see the table below for details).
- Save the file as a comma-separated values (CSV) file.
- Click Upload Bulk Allocations to upload the file.
Warning:
- Don't use commas in your data field values. Commas are reserved for use as separators.
- If any of the required fields are empty, the upload will fail.
To edit field values, you must correct the values in the spreadsheet file, and upload the file again.
Tip: You can export the existing cost segment values into a CSV file for backup.
Searching or Filtering Cost Allocation Codes
In each cost segment you can search for specific cost allocation codes or filter the list to show only a filtered selection of cost allocation codes. Click the Filter button in the upper right corner above the list to show the search field.
If you defined the cost segment as a subsegment (such as Project as a subsegment of Client), the parent segment appears with a drop-down menu so that you can filter the results based on the segment.