Exporting Expense Reports and Batches
As a payer, you can export expense reports, or export one or more batches, with options for totals and subtotals. As part of the typical end-of-period process, after processing a batch, you can export the batch for general ledger (GL) posting, reimbursement, and accrual. You can also export at any other time to support ad-hoc processes such as management reporting and client invoicing.
To export a batch, click the Export button in the batch under the Batches to Process tab. The Export dialog appears with the batch already selected for export.
To export multiple batches or reports, click the Export tab next to the Finalized Batches tab. The Export dialog appears.
Exporting Expense Reports
Follow these steps to export expense reports:
- Click the Report tab at the top of the Export dialog to choose expense reports.
- Choose to select expense reports by status and date range, or by report numbers.
- If you choose By Status and Date Range, you can select one or more statuses (Unsubmitted, Denied, Pending Approval, and Payment Requested), and optionally specify a date range for Transactions, Submitted, or Approval (Approval is grayed out if you choose Pending Approval or Payment Requested).
- If you choose By Report No., you can then enter a single expense report number, a range of numbers, or specific numbers separated by commas.
- Choose a format:
Tip: Click the checkbox for the Example option in order to show a preview of the format you select.- All Details: This format shows all line items. Its purpose is to provide line-item level detail for posting to a partner financial system for end-of-period GL posting.
- Report Totals: This format shows only totals for each expense report.
- Report Subtotals: This format shows subtotals for each expense type in each expense report.
- Employee Totals: This format shows only totals for each employee. You can use this format to prepare reimbursements or to upload to payroll or accounts payable systems. It also provides visibility into the total activity per employee. The export includes only payment types that are reimbursable to the employee.
- Employee Subtotals: This format shows subtotals for each employee by expense type.
- Click Export to export the report.
After clicking Export, you can click Open to see the exported report, or click either Save Online (to save online only) or Save Online and to Folder (to save on your hard drive or network location).
Exporting Batches
Follow these steps to export batches:
- Click the Batch tab at the top of the Export dialog to choose batches. The system remembers the filter selection on the batch pages and pre-populates the Export options page with this selection.
- Choose to select batches by status and date range, or by batch IDs.
- If you choose By Status and Date Range, you can select one or more statuses (Batches to process, Held, or Finalized) and optionally specify a date range for Transactions, Submitted, Approval, or Planned Payment. If you choose the Finalized status, then you must also select additional criteria that is applicable strictly to Finalized, such as a range of batch numbers.
- If you choose By IDs, you can then enter a single batch number, a range of numbers, or specific numbers separated by commas.
- Choose a format:
Tip: Click the checkbox for the Example option in order to show a preview of the format you select.- All Details: This format shows all line items. Its purpose is to provide line-item level detail for posting to a partner financial system for end-of-period GL posting.
- Report Totals: This format shows only totals for each expense report.
- Report Subtotals: This format shows subtotals for each expense type in each expense report.
- Employee Totals: This format shows only totals for each employee. You can use this format to prepare reimbursements or to upload to payroll or accounts payable systems. It also provides visibility into the total activity per employee. The export includes only payment types that are reimbursable to the employee.
- Employee Subtotals: This format shows subtotals for each employee by expense type.
- Click Export to export the report.
After clicking Export, you can click Open to see the exported report, or click either Save Online (to save online only) or Save Online and to Folder (to save on your hard drive or network location).
Exporting a Reconciliation Report
Follow these steps to export a reconciliation report:
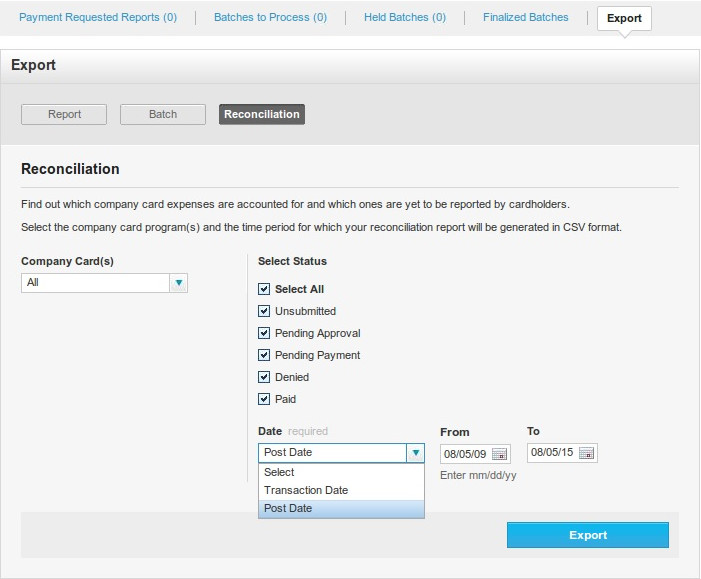
- Click the Reconciliation tab at the top of the Export dialog.
- Choose All in the Company Card(s) dropdown menu, or specific corporate cards.
- Choose to select statuses by clicking the checkboxes for Unsubmitted, Pending Approval, Pending Payment, Denied, and Paid transactions.
- Choose Post Date or Transaction Date from the Date dropdown menu, and specify the date range.
- Click Export to export the report.
Expense generates a comma-separated values (CSV) file at the transaction level of detail for all active corporate card programs in that period.